
Dependency injection has always been one of Angular’s biggest features and selling points. It allows us to inject dependencies in different components across our applications, without needing to know, how those dependencies are created, or what dependencies they need themselves. However, it turns out that the current dependency injection system in Angular 1 has some problems that need to be solved in Angular 2, in order to build the next generation framework. In this article, we’re going to explore the new dependency injection system for future generations.
Want to see things in action first?
Before we jump right into the new stuff, lets first understand what dependency injection is, and what the problems with the DI in Angular 1 are.
Dependency Injection as a pattern
Vojta Jina gave a great talk on dependency injection at ng-conf 2014. In this talk, he presented the story and ideas of the new DI system that will be developed for Angular 2. He also made very clear, that we can see DI as two things: As a design pattern and as a framework. Whereas the former explains the pattern that DI is all about, the latter can be a system that helps us out maintaining and assembling dependencies. I’d like to do the same in this article as it helps us understanding the concept first.
We start by taking a look at the following code and analysing the problems it introduces.
class Car {
  constructor() {
    this.engine = new Engine();
    this.tires = Tires.getInstance();
    this.doors = app.get('doors');
  }
}
Nothing special here. We have a class Car that has a constructor in which we set up everything we need in order to construct a car object once needed. What’s the problem with this code? Well, as you can see, the constructor not only assigns needed dependencies to internal properties, it also knows how those object are created. For example the engine object is created using theEngine constructor, Tires seems to be a singleton interface and the doors are requested via a global object that acts as a service locator.
This leads to code that is hard to maintain and even harder to test. Just imagine you’d like to test this class. How would you replaceEngine with a MockEngine dependency in that code? When writing tests, we want to test different scenarios that our code is used in, hence each scenario needs its own configuration. If we want to write testable code, we need to write reusable code. Our code should work in any environment as long as all dependencies are satisfied. Which brings us to the conclusion that testable code is reusable code and vise versa.
So how can we write this code better and make it more testable? It’s super easy and you probably already know what to do. We change our code to this:
class Car {
  constructor(engine, tires, doors) {
    this.engine = engine;
    this.tires = tires;
    this.doors = doors;
  }
}
All we did is we moved the dependency creation out of the constructor and extended the constructor function to expect all needed dependencies. There are no concrete implementations anymore in this code, we literally moved the responsibility of creating those dependencies to a higher level. If we want to create a car object now, all we have to do is to pass all needed dependencies to the constructor:
var car = new Car(
  new Engine(),
  new Tires(),
  new Doors()
);
How cool is that? The dependencies are now decoupled from our class, which allows us to pass in mocked dependencies in case we’re writing tests:
var car = new Car(
  new MockEngine(),
  new MockTires(),
  new MockDoors()
);
And guess what, this is dependency injection. To be a bit more specific, this particular pattern is also called constructor injection. There are two other injection patterns, setter injection and interface injection, but we won’t cover them in this article.
Okay cool, now we use DI, but when comes a DI system into play? As mentioned before, we literally moved the responsibility of dependency creation to a higher level. And this is exactly what our new problem is. Who takes care of assembling all those dependencies for us? It’s us.
function main() {
  var engine = new Engine();
  var tires = new Tires();
  var doors = new Doors();
  var car = new Car(engine, tires, doors);

  car.drive();
}
We need to maintain a main function now. Doing that manually can be quite hairy, especially when the application gets bigger and bigger. Wouldn’t it be nice if we could do something like this?
function main() {
  var injector = new Injector(...)
  var car = injector.get(Car);

  car.drive();
}
Dependency Injection as a framework
This is where dependency injection as a framework comes in. As we all know, Angular 1 has it’s own DI system which allows us to annotate services and other components and let the injector find out, what dependencies need to be instantiated. For example, the following code shows how we can annotate our Car class in Angular 1:
class Car {
  ...
}

Car.$inject = ['Engine', 'Tires', 'Doors'];
Then, we register our Car as a service and whenever we ask for it, we get a singleton instance of it without needing to care about creating needed dependencies for the car.
var app = angular.module('myApp', []);

app.service('Car', Car);

app.service('OtherService', function (Car) {
  // instance of Car available
});
This is all cool but it turns out, that the existing DI has some problem though:
- Internal cache – Dependencies are served as singletons. Whenever we ask for a service, it is created only once per application lifecycle. Creating factory machinery is quite hairy.
- Namespace collision – There can only be one token of a “type” in an application. If we have a car service, and there’s a third-party extension that also introduces a service with the same name, we have a problem.
- Built into the framework – Angular 1’s DI is baked right into the framework. There’s no way for us to use it decoupled as a standalone system.
These problems need to be solved in order to take the DI of Angular to the next level.
Dependency Injection in Angular 2
Before we take a look at actual code, let’s first understand the concept behind the new DI in Angular 2. The following graphic illustrates required components in the new DI system:
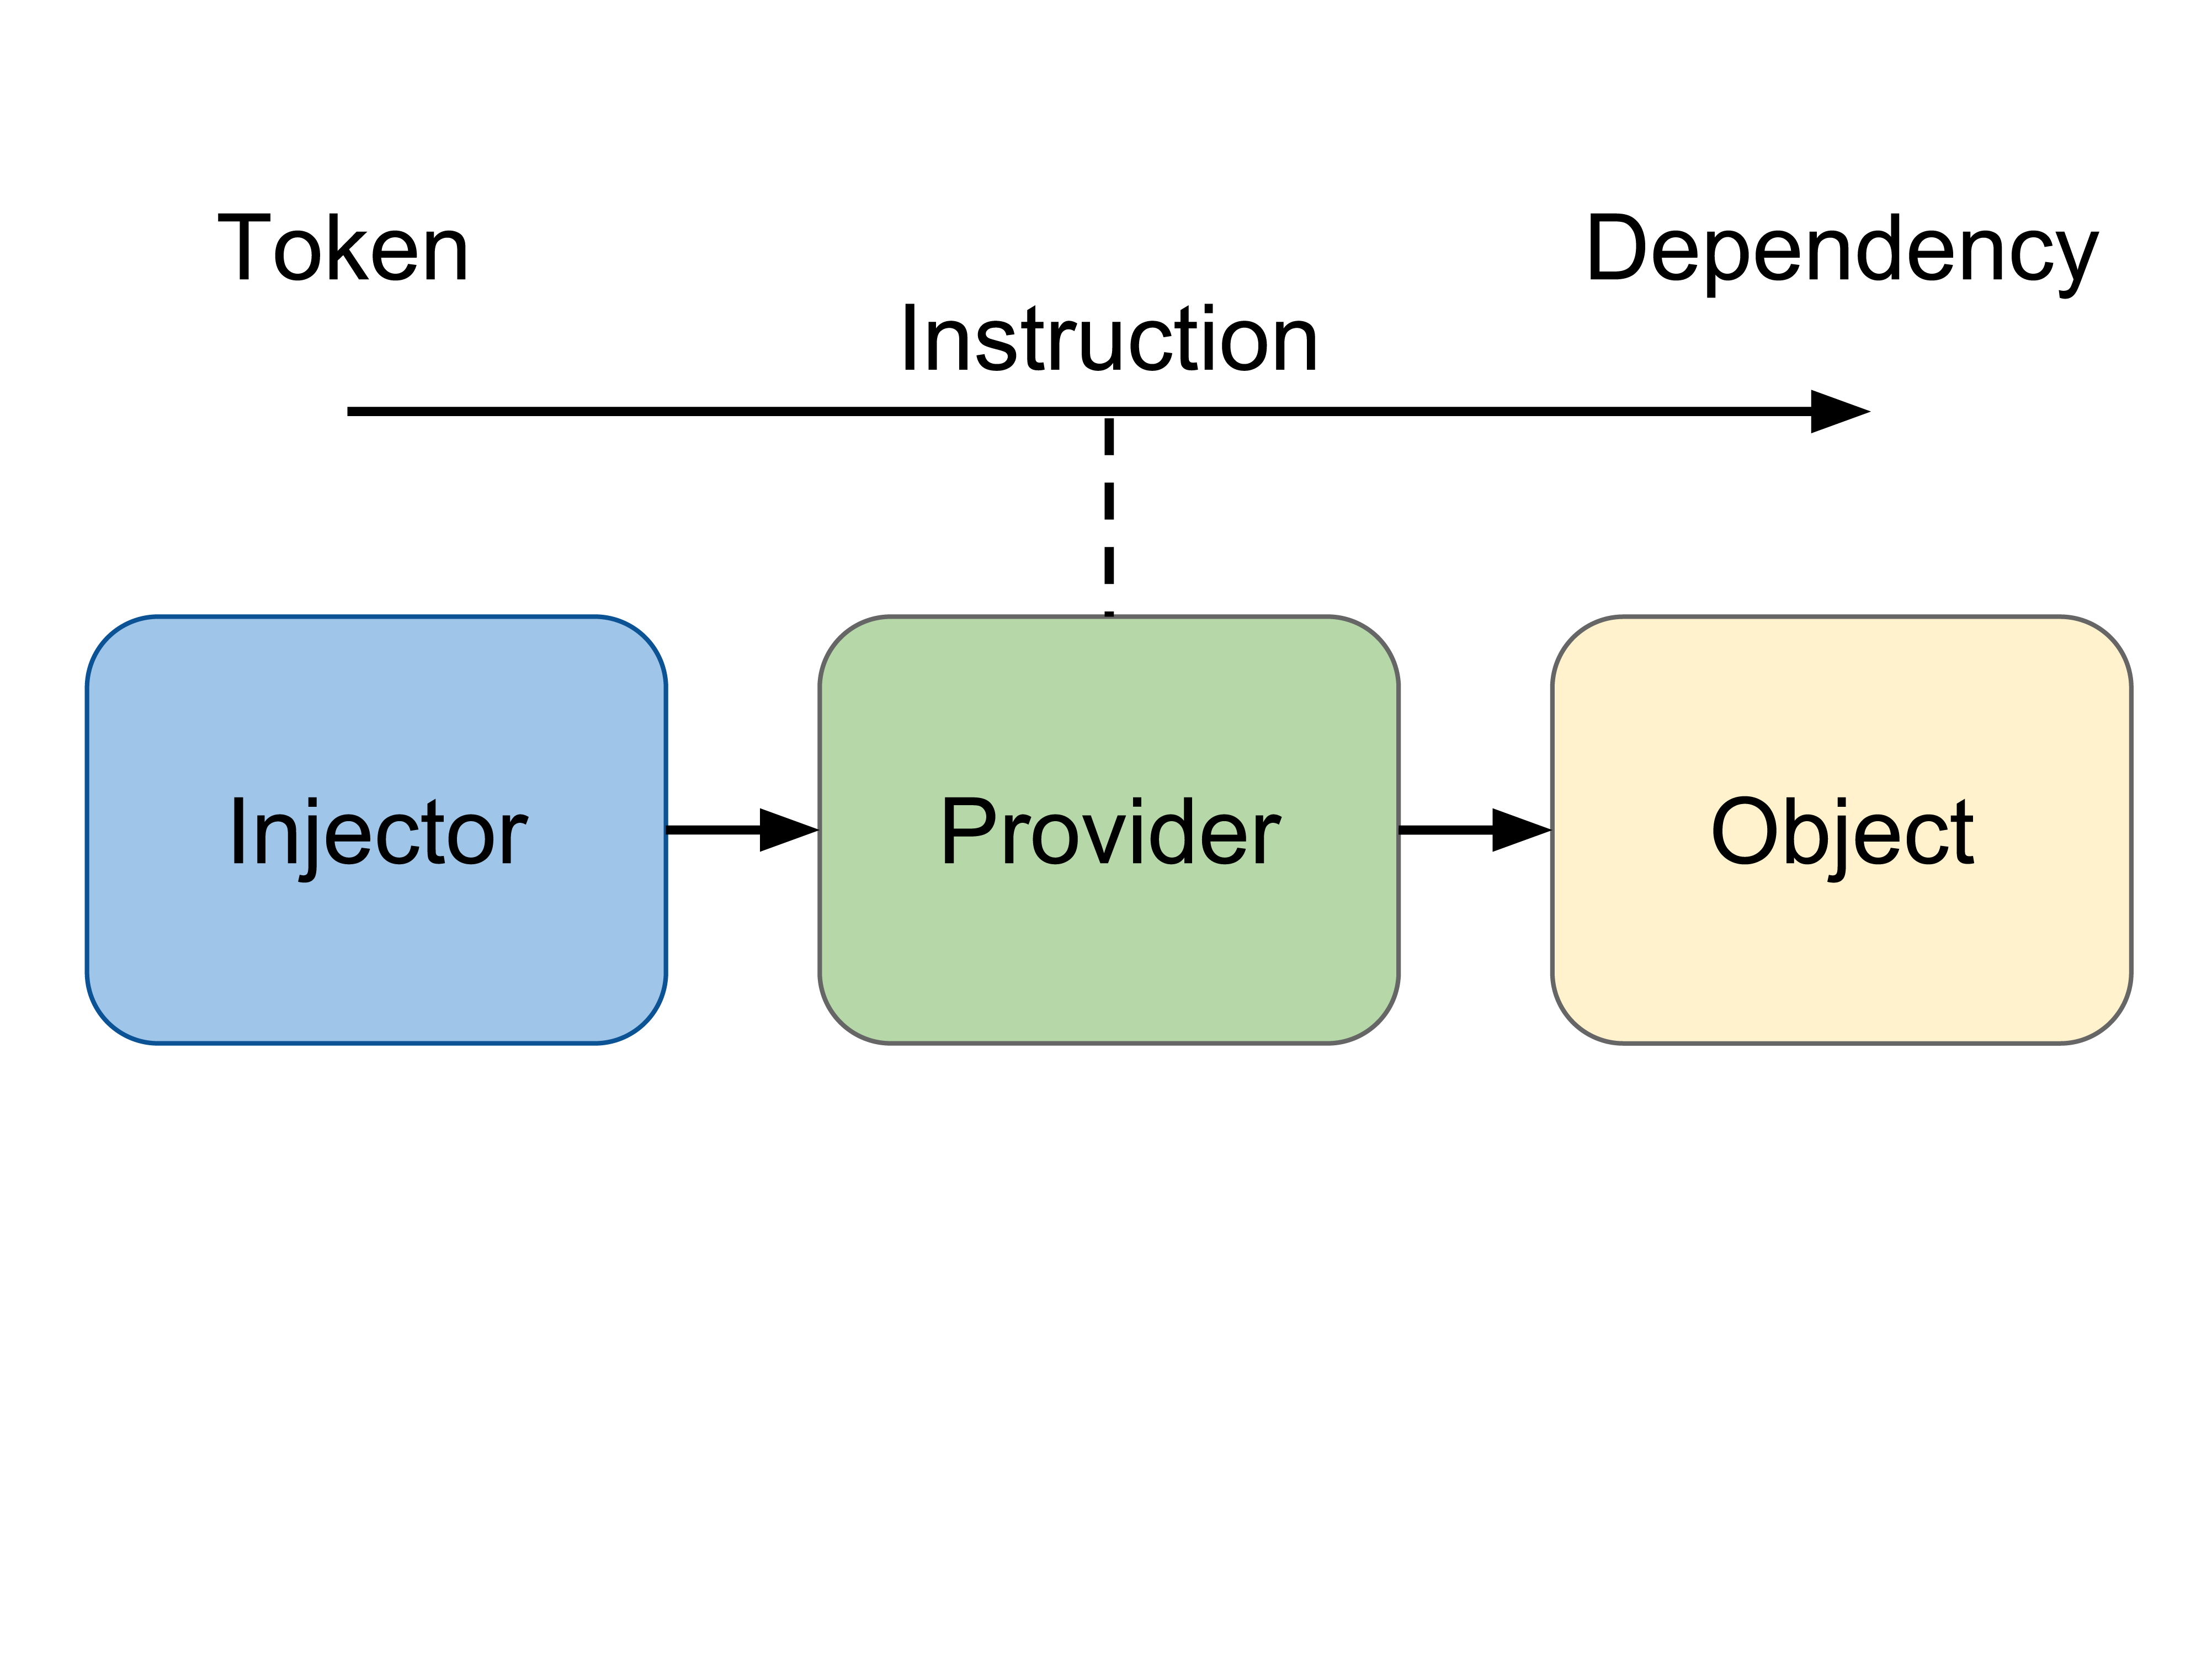
The DI in Angular 2 basically consists of three things:
- Injector – The injector object that exposes APIs to us to create instances of dependencies.
- Provider – A provider is like a recipe that tells the injector how to create an instance of a dependency. A provider takes a token and maps that to a factory function that creates an object.
- Dependency – A dependency is the type of which an object should be created.
Okay, now that we have an idea of what the concept looks like, lets see how this is translated to code. We stick with our Car class and it’s dependencies. Here’s how we can use Angular 2’s DI to get an instance of Car:
import { ReflectiveInjector } from '@angular/core';

var injector = ReflectiveInjector.resolveAndCreate([
  Car,
  Engine,
  Tires,
  Doors
]);

var car = injector.get(Car);
We import ReflectiveInjector from Angular 2 which is an injector implementation that exposes some static APIs to create injectors. resolveAndCreate() is basically a factory function that creates an injector and takes a list of providers. We’ll explore how those classes are supposed to be providers in a second, but for now we focus on injector.get(). See how we ask for an instance of Car in the last line? How does our injector know, which dependencies need to be created in order to instantiate a car? A look at our Car class will explain…
import { Inject } from 'angular2/core';

class Car {
  constructor(
    @Inject(Engine) engine,
    @Inject(Tires) tires,
    @Inject(Doors) doors
  ) {
    ...
  }
}
We import something called Inject from the framework and apply it as decorator to our constructor parameters.
The Inject decorator attaches meta data to our Car class, that is then consumed by the DI system afterwards. So basically what we’re doing here, is that we tell the DI that the first constructor parameter should be an instance of type Engine, the second of typeTires and the third of type Doors. We can rewrite this code to TypeScript, which feels a bit more natural:
class Car {
  constructor(engine: Engine, tires: Tires, doors: Doors) {
    ...
  }
}
Nice, our class declares it’s own dependencies and the DI can read that information to instantiate whatever is needed to create an object of Car. But how does the injector know how to create such an object? This is where the providers come into play. Remember the resolveAndCreate() method in which we passed a list of classes?
var injector = ReflectiveInjector.resolveAndCreate([
  Car,
  Engine,
  Tires,
  Doors
]);
Again, you might wonder how this list of classes is supposed to be a list of providers. Well, it turns out that this is actually a shorthand syntax. If we translate this to the longer, more verbose, syntax, things might become a bit more clear.
var injector = RelfectiveInjector.resolveAndCreate([
  { provide: Car, useClass: Car },
  { provide: Engine, useClass: Engine },
  { provide: Tires, useClass: Tires },
  { provide: Doors, useClass: Doors }
]);
We have an object with a provide property, that maps a token to a configuration object. The token can either be a type or a string. If you read those providers now, it’s much easier to understand what’s happening. We provide an instance of type Car via the classCar, type Engine via the class Engine and so on and so forth. This is the recipe mechanism we were talking about earlier. So with the providers we not only let the injector know which dependencies are used across the application, we also configure how objects of these dependencies are created.
Now the next question comes up: When do we want to use the longer instead of the shorthand syntax? There’s no reason to write{ provide: Foo, useClass: Foo} if we could just stick with Foo, right? Yes, that’s correct. That’s why we started with the shorthand syntax in the first place. However, the longer syntax enables us to do something very very powerful. Take a look at the next code snippet.
{ provide: Engine, useClass: OtherEngine }
This is super powerful, because this allows us not only to prevent name collisions, we can also create a type as interface and bind it to a concrete implementation. In addition to that, we can swap out the actual dependency for a token in a single place without touching any other code.
Angular 2’s DI introduces a couple of other provider recipes which we explore in the next section.
Other provider configurations
Sometimes, we don’t want to get an instance of a class, but rather just a single value of something or a factory function where more configuration is needed. That’s why the provider mechanism of Angular 2’s DI comes with more than just one recipe. Lets take a quick look at them.
Providing values
We can provide a simple value using useValue: value
{ provide: 'some value', useValue: 'Hello World' }This comes in handy when we want to provide simple configuration values.
Providing aliases
We can map an alias token to another token like this:
{ provide: Engine, useClass: Engine }
{ provide: V8, useExisting: Engine }
Providing factories
Yes, our beloved factories.
{
  provide: Engine,
  useFactory: () => {
    if (IS_V8) {
      return new V8Engine();
    } else {
      return new V6Engine();
    }
  }
}
Of course, a factory might have its own dependencies. Passing dependencies to factories is as easy as adding a list of tokens to the factory:
{
  provide: Engine,
  useFactory: (car, engine) => {

  },
  deps: [Car, Engine]
}
Optional Dependencies
The @Optional decorator lets us declare dependencies as optional. This comes in handy if, for example, our application expects a third-party library, and in case it’s not available, it can fallback.
class Car {
  constructor(@Optional(jQuery) $) {
    if (!$) {
    // set up fallback
    }
  }
}
As you can see, Angular 2’s DI solves pretty much all issues we have with Angular 1’s DI. But there’s still one thing we haven’t talked about yet. Does the new DI still create singletons? The answer is yes.
Transient Dependencies and Child Injectors
If we need a transient dependency, something that we want a new instance every time we ask for a dependency, we have two options:
Factories can return instances of classes. Those won’t be singletons. Note that in the following code we’re creating a factory.
{
  provide: Engine,
  useFactory: () => {
    return () => {
      return new Engine();
    }
  }
}
We can create a child injector using Injector.resolveAndCreateChild(). A child injector introduces its own bindings and an instance of an object will be different from the parent injector’s instance.
var injector = ReflectiveInjector.resolveAndCreate([Engine]);
var childInjector = injector.resolveAndCreateChild([Engine]);

injector.get(Engine) !== childInjector.get(Engine);
Child injectors are even more interesting. It turns out that a child injector will look up a token binding on it’s parent injector if no binding for the given token is registered on the child injector. The following graphic visualises what happens:

The graphic shows three injectors where two of them are child injectors. Each injector gets its own configuration of providers. Now, if we ask the second child injector for an instance of type Car, the car object will be created by that child injector. However, the engine will be created by the first child injector and the tires and doors will be created by the outer most parent injector. It kind of works like a prototype chain.
We can even configure the visibility of dependencies, and also until where a child injector should look things up.
How is it used in Angular 2 then?
Now that we’ve learned how the DI in Angular 2 works, you might wonder how it is used in the framework itself. Do we have to create injectors manually when we build Angular 2 components? Luckily, the Angular team spent a lot of energy and time to find a nice API that hides all the injector machinery when building components in Angular 2.
Lets take a look at the following simple Angular 2 component.
@Component({
  selector: 'app',
  template: '<h1>Hello !</h1>'
})
class App {
  name = 'World';
}
Nothing special here. Lets say we want to extend this component by using a NameService that is used in the component’s constructor. Such a service could look something like this:
class NameService {
  name = 'Pascal';;

  getName() {
    return this.name;
  }
}
Again, nothing special here. We just create a class. Now, to make it available in our application as an injectable, we need to pass some provider configurations to our application’s injector. But how do we do that? We haven’t even created one.
To boostrap an application, we define an NgModule. The @NgModule() decorator creates metadata that can include providers, just like this:
@NgModule({
  imports: [BrowserModule],
  providers: [NameService],
  declarations: [App],
  bootstrap: [App]
})
export class AppModule {}
That’s it. Now, to actually inject it, we just use the tools we’ve already learned about – @Inject decorators.
class App {
  constructor(@Inject(NameService) NameService) {
    this.name = NameService.getName();
  }
}
Or, if we prefer TypeScript, we can just add type annotations to our constructor:
class App {
  constructor(NameService: NameService) {
    this.name = NameService.getName();
  }
}
Awesome! All of a sudden, we don’t have any Angular machinery at all anymore. But there’s one last thing: What if we want a different binding configuration in a specific component?
Lets say we have NameService as application wide injectable for the type NameService, but one particular component should get a different one? This is where the @Component decorators’ providers property comes in. It allows us to add providers to a specific component (and its child components).
@Component({
  selector: 'app',
  providers: [
    {provide: NameService, useValue: 'Thomas' }
  ],
  template: '<h1>Hello {{name}}!</h1>'
})
class App {
  ...
}
To make things clear: providers doesn’t configure the instances that will be injected. It configures a child injector that is created for that component. As mentioned earlier, we can also configure the visibility of our bindings, to be even more specific which component can inject what. E.g. the viewProviders property allows to make dependencies only available to a component’s view, but not its children.
Conclusion
The new dependency injection system in Angular solves all the problems that we have with the current DI in Angular 1. No name collisions anymore. It’s an isolated component of the framework that can be used as standalone system, without Angular 2 itself.
Check out the demos below!

